This tutorial is about configuring Memcached with LiteSpeed caching tool for the WordPress website. To implement this tutorial, you must have the LiteSpeed Server support and Memcached support in the dedicated, shared or VPS web hosting. The procedure is going to represent with the help of cPanel. So, please be sure that you have cPanel as a Hosting Control Panel.
What is Memcached?
Memcached is using for memory caching system. It is free and open-source software. It’s used to reduce the number of times needed to read data from the database because it helps the website while loading by caching data and objects in RAM.
What is LiteSpeed Cache?
LiteSpeed Cache is the caching system for the LiteSpeed server. This caching system is available for different CMS or frameworks. But, to run it, the server must have LiteSpeed Server support. It has both free or paid editions. The free edition has resource limitations. Besides, the paid edition has its own requirements. It has some advanced features: caching system, CDN support, Image Optimization, Page Optimization, Crawler, and many features we must need to optimize a website in the best way. The most exciting thing is, it has its own CDN system, which helps to reduce the time of loading static data.
With the combination of both Memcached and LiteSpeed, a website can be load faster than at any time. Before starting, please ensure you have the LiteSpeed Cache for WordPress (LSCWP) plugin installed with your WordPress website. If not, then it’s got here.
Step 1:
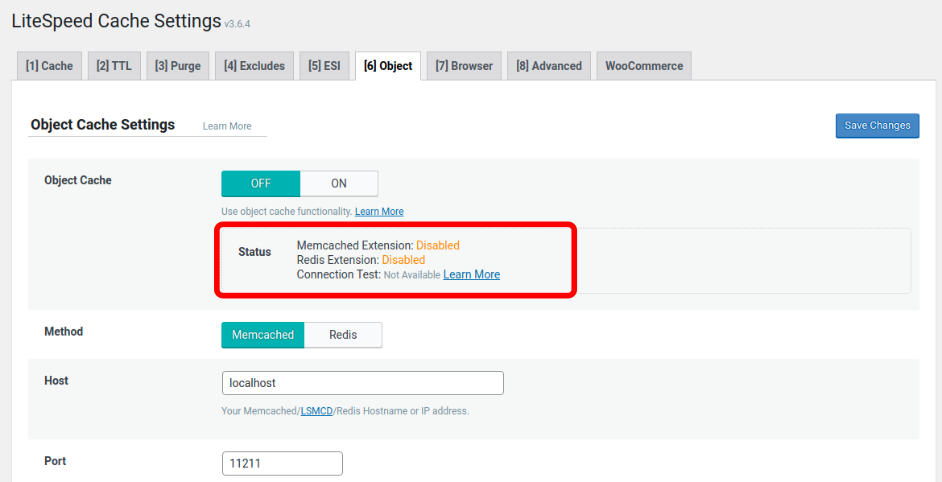
Log In to the WordPress Dashboard. Go to LiteSpeed Cache > Cache > Object. We can see the Memcached Extension is Disabled and also, the Connection Test is showing Not Available. So, we need to enable the extension first to establish the connection.
Step 2:
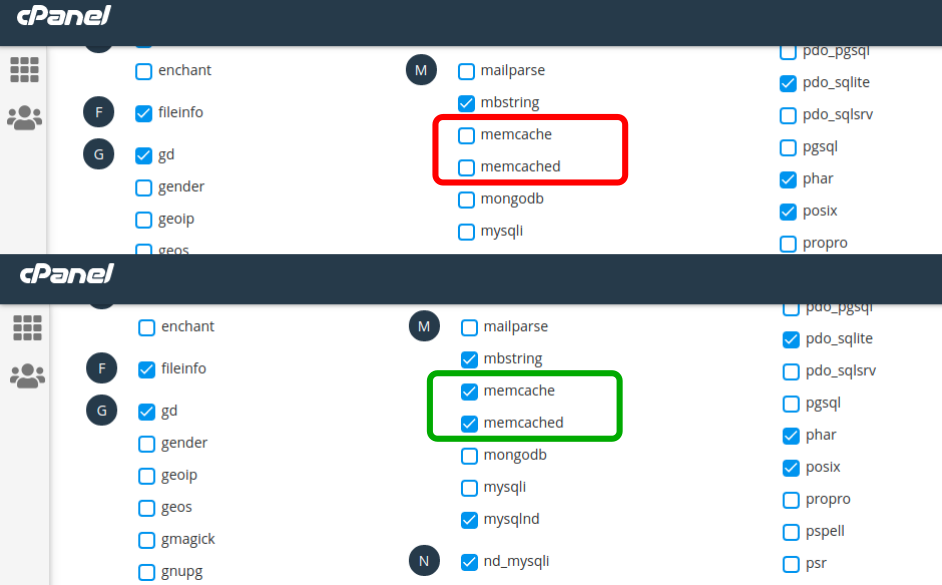
Log In to the cPanel. Scroll Down. Under the Software section, there’s a module named Select PHP Version. Click on it and go to the Extension tab. There will be found two extensions. One is Memcache and another one is Memcached. Mark both of them.
Step 3:
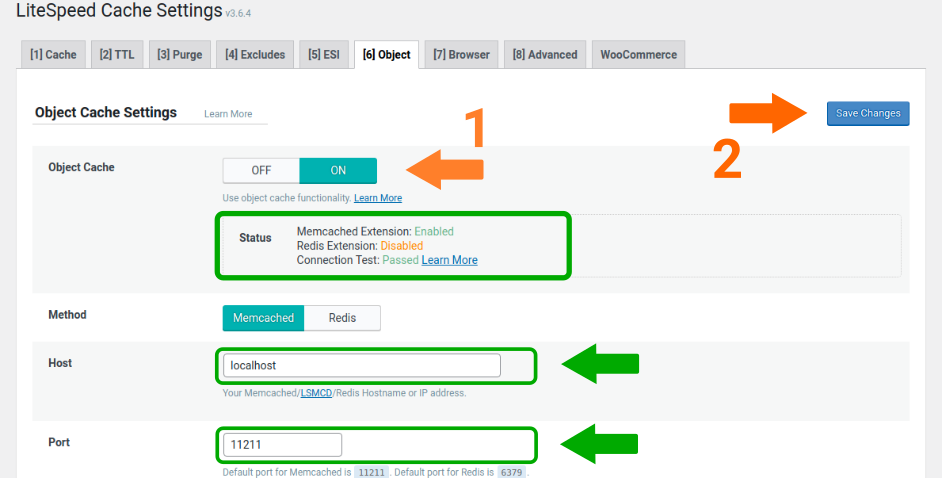
After completing Step 2, repeat Step 1. Now, we can see Memcached Extension is Enabled and also the Connecting Test has been Passed. Make sure the Host is localhost and Port is set as 11211. It’s the default port of Memcached (Source: Wikipedia).
Finally, turn ON the Object Cache function and press Save Changes. The page will be reloaded and DONE!
NB. The tutorial has been represented with
- LiteSpeed Cache v3.6.4
- cPanel v96.0.9
- PHP v7.4
The interface can be different based on the version. So, please don’t be panic if everything is not observed from the same to same. Properly use the brain.
Troubleshoot
If it isn’t shown Enabled on the WordPress Dashboard after enabling the extensions from cPanel, there may need to follow a few things to troubleshoot this issue. First, if one method doesn’t work, go for the next one.
Method 1:
Create an info.php file under the domain root directory. In most cases, the directory is public_html. Copy and Paste the code into the info.php.
<?php

// Show all information, defaults to INFO_ALL
phpinfo();

?>
Now, browse the file in this format <domain URL>/info.php. This is the PHP information page of the server/hosting. There are found two sections on the information page, i.e., Memcache and Memcached, which show they are enabled or not.
If you found they are enabled but cannot work, confirm the Selected PHP version and the WordPress website’s PHP version.
Method 2:
My suggestion is to contact your service provider or server admin with the issue in this method.


0 Comments